Building a Traditional Wood El Toro Sailboat

This page is a reproduction of a webpage I developed in the early 2000s. It looks different, but the content is the same.
Please note: at the time this page is being posted it has been at least 15 years since I’ve built an El Toro and I have not had one for over ten years. I’m posting this because I still get requests for information about building an El Toro the traditional way and I’d like to help new builders as much as I can remember.
This presentation is pretty much self explanatory.
Lumber
Initially I had many problems finding lumber for this project. I bought some wood from a local boat builder which was supposed to be Honduras Mahogany. What a deal, only $2.00 per board foot. Now I must insert here that I’m no wood expert. After many broken drill bits and screws and hours of hard hand planing and attempts to bend chines, I discovered the wood was actually padouk. Padouk is a very hard tropical wood that is extremely difficult to work with, all be it very pretty. I now use my local Lumberman’s as my supplier. I’m paying about $6.00 per board foot for Philippine mahogany. I’ve seen it anywhere from $5.00 to $12.00 per board foot. Shop around.
I planked the boat with 1/4 inch marine mahogany plywood. I’ve built many boats using many materials including ACX, Luan door skins, and Marine Fir. Even coated with fiberglass, the best I could do was get five years of of a luan boat. Fir, whether orn not fiberglassed tends to check. It takes the same amount of work to build a boat with cheap materials or good quality materials, so you may as well use the good stuff and build a boat that will last many, many years.
I’ve seen some boats constructed with 4 mm marine plywood. I chose not to use it. 4 mm is strong and will work but I’ve sat in boats side-by-side and felt the difference between 1/4 inch and 4 mm. I’m not fiberglassing the hull so 1/4” is the way I’m going on this boat. (NOTE: as of this update I’ve built many boats and use both 4 and 6 mm plywood with satisfactory results.
I’m not having any luck finding reasonably priced spruce for the spars. One supplier said to thank the companies that make pianos. They buy up much of the spruce from mills as soon as it comes out, using it for piano soundboards.
I thought about having someone else make the spars, but the quotes were anywhere from $350 to well over $1000. I can do better than that. I think I’ll settle for CVG fir which is plentiful in this neck of the woods.
Fasteners and Adhesive
I use West System Epoxy thickened with 403 microfibers for the adhesive on all boats I build. I use silicon bronze screws throughout as specified by the plans. Bronze boat nails work too, but they tend to pucker the plywood when you set them. I went for the strength. If you are looking for the best place to get your adhesive and fasteners I highly recommend Jamestown Distributors. I’ve been doing business with them for years and their online store is very convenient. Their catalog makes good winter by the fire reading too!
Hardware
Finding hardware was both fun and frustrating. Initially I ordered most of the parts listed on the plan sheet from West Marine. They did not have a gooseneck and there the search began. Some nice folks on the El Toro home page (Thanks Sandy Lowry) gave me the name of Racelite South Coast Inc. 16514-16 Broadway Ave, Cleveland OH, 44137, (216) 581-4600. These people are awesome! They took my order and sent the part in just a couple days. Unfortunately they do not make the tracks for the gooseneck but did give me the name of the company they say buys most of their products - Glen-L. Glen-L was equally wonderful and they sent parts out the day I ordered. I highly recommend all these businesses.
Plans

I spent a lot of time pouring over the plans prior to beginning construction. The plans contain all the information needed, although it does take a lot of measuring and calculating - in boat speak - “Lofting.”
Plans are available from the El Toro Yacht Racing Association.
Building the Jig

The first step is to loft and build the jig. I did not take pictures of this process, but you can see the jig in this picture. You can also see the keel being clamped to the jig.
Bending the Chines


Chines are bent around and temporarily fastened to the jig. This is one of the most difficult parts of constructing the boat. I ended up laminating three pieces of mahogany 3/8” thick to make up the 1 1/8” thick chine. the laminated chine should be much stronger than a one-piece chine and it sure bent a lot easier.


The bow and stern transoms are cut to shape and temporarily fastened to the jig. The transoms are fastened to the chines and keel
Planing the Chines and Keel


This process was one of the most fun parts of the project for me. A straight edge is laid across the keel and the chine to determine the area to be planed. The sound of the plane peeling shavings is so sweet.
Planking the Sides

After the chines and keels are planed teh sides are clamped to the jig. I then scribed the outline of the sides and cut them out. The planking is fastened with 3/4” number 6 silicon bronze screws.


Planking the Bottom

This is another tricky part. The compound curve on the bottom makes determining the shape of the planks a bit difficult. I laid the plank on and scribed the chine and transoms. I cut the plank to the rough shape, then used a hand plane to obtain the final shape along the keel and transoms. Like I said, I love using a plane.


Outer Keel

After the bottom is planked the outer keel is fastened through the planking to the inner keel.
Removing the Hull from the Jig

Taking the hull off the jig is a significant reward! it is not starting to look like a boat.
Deck Framing

Framing the deck is fun, but complicated with all the compound angles.
Daggerboard Trunk

Deck framing complete, it’s time to tackle the daggerboard trunk. This was nerve racking. It is mentally difficult to cut a hole in the bottom of the boat you are trying to make watertight.
Mast Step, Thwart and Deck

Fitting the deck, mast step and thwart is quite tedious with a lot of measuring and fitting angles. I did not take a lot of pictures of these processes but here is a picture of those parts in place.
Splash Boards and Deck Trim


The splash boards have the most complicated compound angles… kind’a fun to figure out.
Carving Numbers

We’re official now. I used a router to carve the number into the keel.
Rudder, Daggerboard and Tiller

Some folks call these “blades.” I don’t. The rudder and daggerboard are made from mahogany, the tiller is made from padouk.
Laminating the Mast
After all the work construction the hull i was ready hire out the spar construction. I checked a variety of sources and got quotes from $300 all the way up to $1200. I only paid $250 for my first El Toro (6197) and wasn’t about to pay that kind of money for a couple of sticks! I went down to the local lumberyard and got three 14 foot 1 x 3 CBG (clear, vertical grain) fir boards. I laminated the three together, then ripped them down the center, outed the sail track and then relaminated them. I messed up trying to clean out the sail track with a circular saw. I split the top foot and a half and had to start all over again.
This time I did things a little different. here are pictures to help explain. Don’t pay attention to the grain patterns as I mixed pictures of the two different masts because the angles were better.
Even with throwing the first mast away, the mast still cost less than $60.

First step: Laminate three 1 x 3 inch boards together.


It does not matter if the boards are not perfectly straight. put all the clamps on one side of the boards and run a string down one edge. Adjust the clamps to pull the mast true. After the mast is straight, tighten all the clamps (left photo.) Then remove every other clamp and put them on the other side of the boards so you get even pressure from both sides (right photo.)
Routing the Sail Track Cove


After the mast has been laminated i ripped it down the center and routed the sail track cove with a half round bit. The right picture shows the area where the sail enters the track.


The left photo shows the view of the cove from the top of the mast. The right photo shows the same view after I used a straight shank router bit to take off 3/32” for the area where the sail connects to the bolt rope through the track.
Re-laminating the mast

With all the routing finished I sanded the track then varnished it with three coats, sanding between each coat. I was careful not to get any varnish on the mating surfaces where glue was going to be applied.
Again I had the opportunity to pull the mast true using the same process of clamping on one side, running a string, then flip-flopping every other clamp.
This photo shows an end view of the re-laminated mast.
Masthead Assembly


At one time I saw a masthead assembly for an El Toro that used no sheave. It worked quite well so I thought I’d try it. These photos show the parts laid out just before assembly. I think you can figure out how it goes together. It does work just fine.
Finished Hull


The finished hull!
On the Road

Here we are loaded up with “his and hers” on a rack I built for the truck to haul two boats. This is just the prototype. I had to construct something that would hold both boats in a way that our aging, out of shape bodies could lift them into place. I need to make sure the masts cleared the top of the truck cab. The first design works very well. We can easily lift the boats into place. From the water it takes less than fifteen minutes before we are back on the road ready to go home. Not that I’m ever in any kind of hurry to get home after a day of sailing. This winter I’ll get some nice lumber and build that same rack so it looks presentable.
On the Water
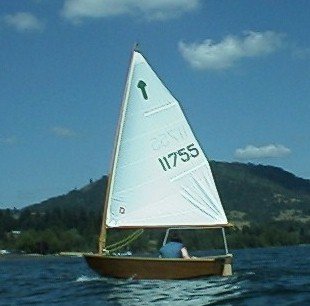
A picture is worth a thousand words. I hope you have enjoyed this site as much as I have enjoyed putting it together.